Skip to content

Use code WELCOME30 to get 30% off your first purchase! Click here and fill in your details to claim the discount. Use code WELCOME30 to get 30% off your first purchase! Click here and fill in your details to claim the discount. Use code WELCOME30 to get 30% off your first purchase! Click here and fill in your details to claim the discount. Use code WELCOME30 to get 30% off your first purchase! Click here and fill in your details to claim the discount. Use code WELCOME30 to get 30% off your first purchase! Click here and fill in your details to claim the discount. Use code WELCOME30 to get 30% off your first purchase! Click here and fill in your details to claim the discount. Use code WELCOME30 to get 30% off your first purchase! Click here and fill in your details to claim the discount. Use code WELCOME30 to get 30% off your first purchase! Click here and fill in your details to claim the discount. Use code WELCOME30 to get 30% off your first purchase! Click here and fill in your details to claim the discount.

  • User Account
  • Business
  • Features
  • Earn
  • Login
  • User Account
  • Business
  • Features
  • Earn
  • Login
  • Languages
    • EN Help
    • DE Hilfe
    • BA Pomoć
    • FR Aide
    • Sl Pomoč
  • Languages
    • EN Help
    • DE Hilfe
    • BA Pomoć
    • FR Aide
    • Sl Pomoč
Get Started

User Account

5
  • How to register
  • General settings
  • How to change your password
  • How to add an additional user account for employees
  • How to edit permissions for accounts created for employees

Business Management

6
  • How to Set Up e-Invoices
  • How to Set Up Email SMTP Settings
  • How to customize the appearance of invoices/estimates
  • How to set the tax rate
  • How to set up online payment
  • How to manage your business

App Features

9
  • Dashboard
  • Project Creation, Tracking, and Management
  • Creating and managing invoices
  • Creating and managing estimates
  • Managing accounts, vendors, expenses, and products
  • Managing customers/clients
  • How to create a recurring invoice
  • Managing business reports
  • Managing HR (Human Resources)

Subscription Management

1
  • How to manage subscriptions?

Earn with us

1
  • How to earn with us
View Categories
  • Home page
  • Knowledge Base
  • Business Management
  • How to Set Up e-Invoices

How to Set Up e-Invoices

3 minutes to read

Welcome to the guide for setting up and using the e-Invoice system within the AdBooks application. This module allows you to generate invoices in XML format, fully compliant with the UBL 2.1 European EN 16931 standard.

🚀 How to Access e-Invoice Settings #

By default, e-Invoices are disabled. To activate and configure them, follow these steps:

  1. Click on your name in the top-right corner of the screen.
  2. Select “Account Settings” from the dropdown menu.
  3. In the left menu, click on “e-Invoice Settings”.

💡 Quick Link: You can access the settings directly via this link:app.adbooks.co/admin/business/einvoice_settings

🔧 System Activation and Configuration #

1. Enabling the Feature #

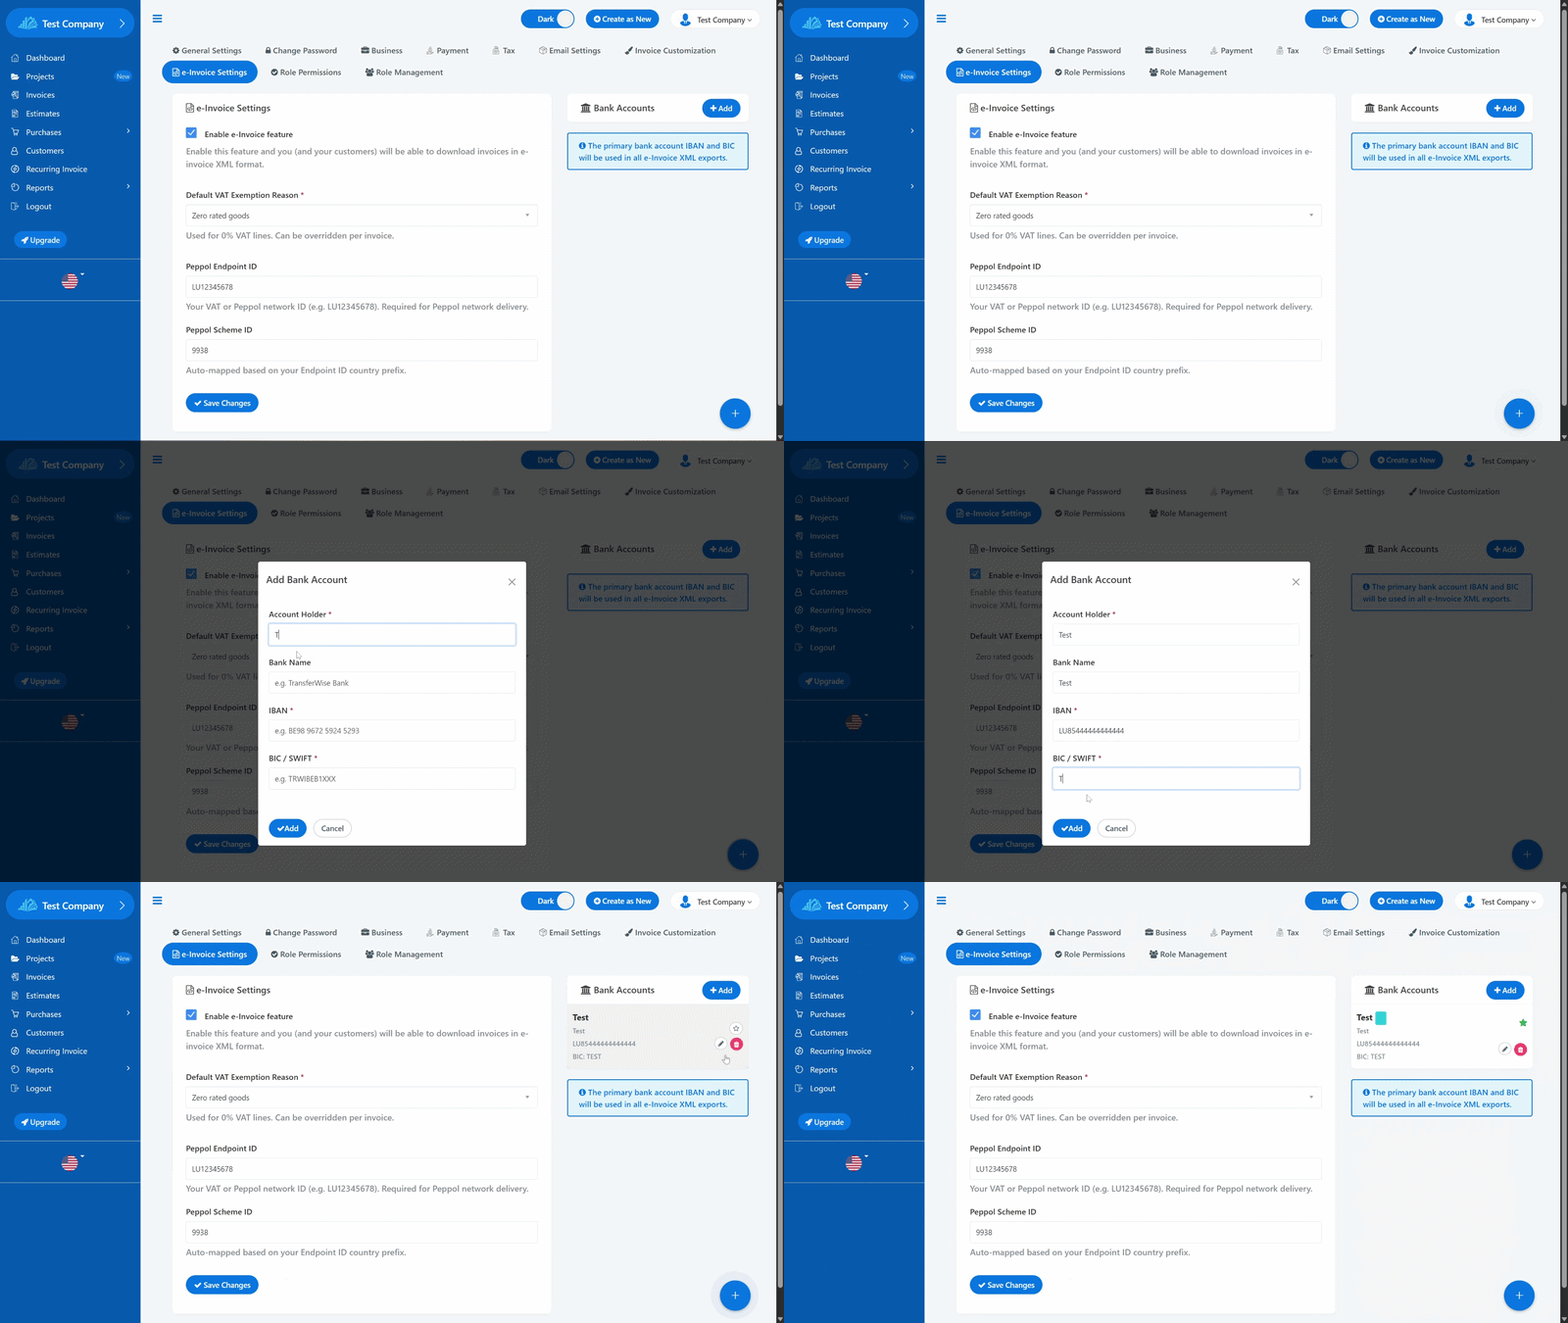
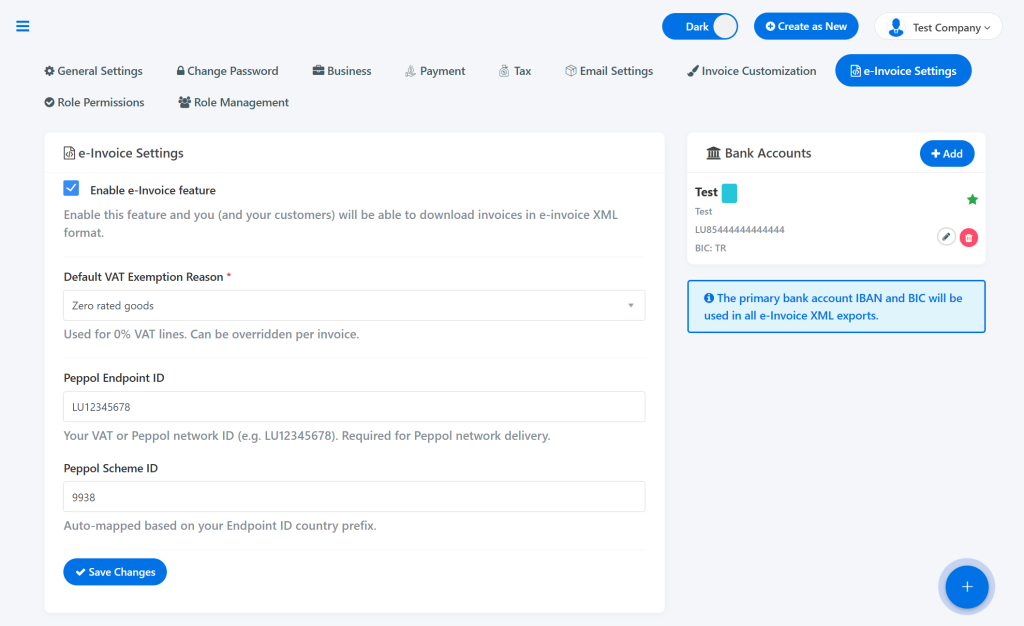
  • Check the “Enable e-Invoice feature” option.
  • Click the “Save changes” button at the bottom of the page.

2. Entering Mandatory e-Invoice Data #

To ensure the e-Invoice system functions correctly, you must fill out the following fields:

  • Default VAT exemption reason * Select the default VAT exemption reason that will automatically appear on all invoices (you can change this manually for individual invoices when creating them). The available options are:
    • Intra-community supply
    • Reverse charge
    • Export outside the EU
    • Not subject to VAT
    • Exempt from VAT
    • Zero-rated goods
  • Peppol Endpoint ID Enter your VAT number with the country prefix (e.g., BA123456789000 or LU12345678). If your company is not VAT-registered, enter your official registration/tax ID number.
  • Peppol Scheme ID (ID Peppol sheme): You do not need to change this field. The system automatically generates it based on the first two letters (country code) of your Endpoint ID.

Once all data is entered, click “Save changes”.

🏦 Adding and Configuring a Bank Account (Mandatory!) #

⚠️ IMPORTANT: Without a configured default (primary) bank account, the e-Invoice export option will not be visible in the application!

How to add and set a default account: #

  1. On the right side of the screen, click the “Add” button.
  2. In the pop-up window, enter the bank account details:
    • Account Owner
    • Bank Name
    • IBAN
    • BIC / SWIFT
  3. Click “Add” to save the account.
  4. The Critical Step: Click on the star icon next to the added account. Once the star turns green, this account is set as the Default and will appear on all your e-Invoice XML documents.

Note: You can add multiple bank accounts, but only one can be marked with the green star as the default.

📄 How to Export an e-Invoice (XML)? #

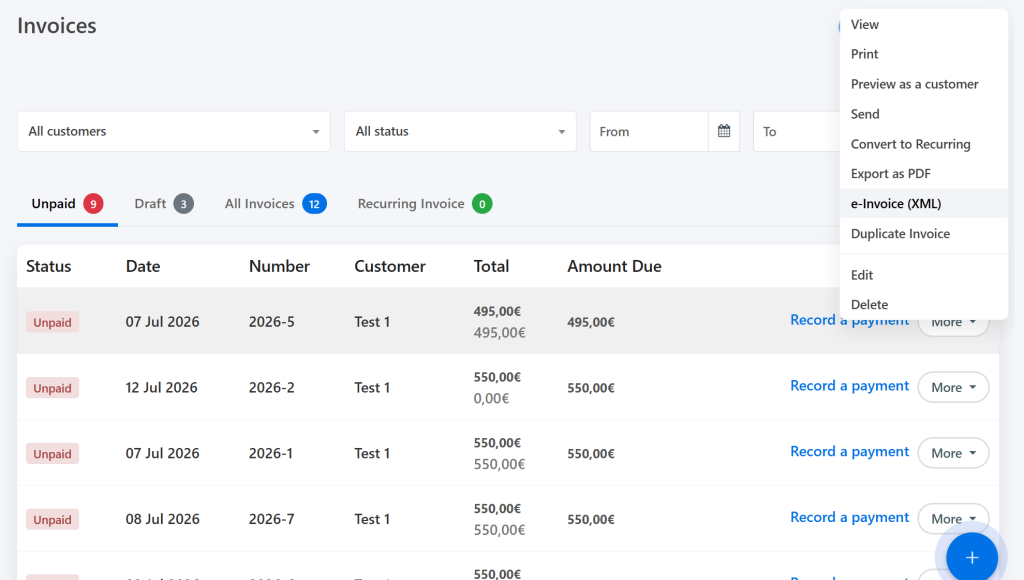
Once e-Invoices are successfully enabled and configured, a new option will appear in all locations within the app where invoices are managed.

Right below the standard “Export as PDF” option, you will see the “e-Invoice (XML)” option. Clicking this allows both you and your clients to download an e-Invoice ready for processing and transfer at the European level.

⚠️ Troubleshooting and Data Verification #

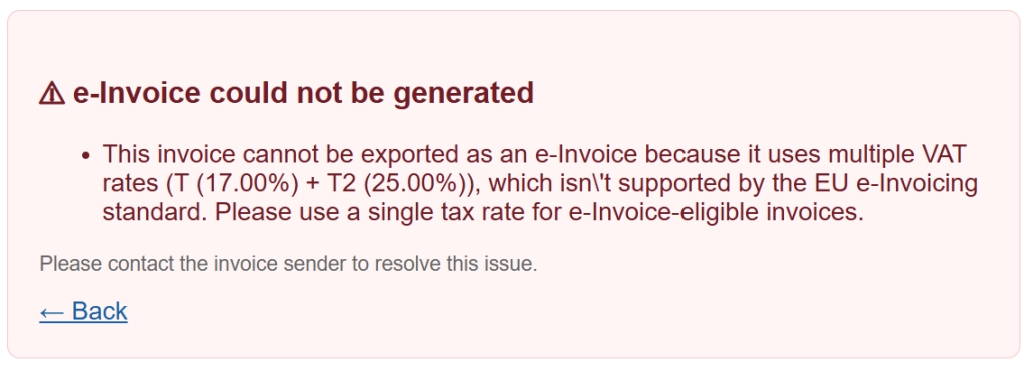
AdBooks has you covered! If the application blocks the export to the e-Invoice (XML) format, it means some mandatory legal information is missing from either the invoice itself or your company profile.

If this happens, the application will automatically display a pop-up window explaining exactly what is missing.

Most Common Reasons for Warnings: #

  • Missing title or description of the product/service.
  • Missing VAT number of the client or your company.
  • No default bank account selected (the green star is missing).
  • Missing other legally required company details (address, city, etc.).

Simply follow the instructions in the pop-up, fill in the missing data, and your XML file will be ready for download in seconds!

Updated on July 14, 2026

Kako vam je pomogao ovaj članak?

How to Set Up Email SMTP Settings

Leave a Reply Cancel reply

Your email address will not be published. Required fields are marked *

Content
  • 🚀 How to Access e-Invoice Settings
  • 🔧 System Activation and Configuration
    • 1. Enabling the Feature
    • 2. Entering Mandatory e-Invoice Data
  • 🏦 Adding and Configuring a Bank Account (Mandatory!)
    • How to add and set a default account:
  • 📄 How to Export an e-Invoice (XML)?
  • ⚠️ Troubleshooting and Data Verification
    • Most Common Reasons for Warnings:

Start your free trial today!

Don’t wait! Start invoicing in just a few minutes and optimize your business.

Try for free
Facebook-f Instagram Youtube Jki-open-book-light
Company
  • Prices
  • About Us
  • My AdBooks Account
  • Blog
  • Knowledge Base
Legal Notices
  • Impressum
  • Terms and Conditions
  • Privacy Policy
  • Contact Us
Languages
  • English
  • Deutsch
  • Bosanski
  • Français
  • Slovenščina
Knowledge Base
  • EN Help
  • DE Hilfe
  • BA Pomoć
  • FR Aide
  • Sl Pomoč
AdBooks Knowledge Base

AdBooks Knowledge Base is your source for all information about our application. Find guides, tutorials, and answers to frequently asked questions in 5 languages: English, German, Bosnian, French, and Slovenian. The knowledge base is here to help you make the most of AdBooks’ features and improve your business.

© AdBooks. All rights reserved.