Skip to content

Use code WELCOME30 to get 30% off your first purchase! Click here and fill in your details to claim the discount. Use code WELCOME30 to get 30% off your first purchase! Click here and fill in your details to claim the discount. Use code WELCOME30 to get 30% off your first purchase! Click here and fill in your details to claim the discount. Use code WELCOME30 to get 30% off your first purchase! Click here and fill in your details to claim the discount. Use code WELCOME30 to get 30% off your first purchase! Click here and fill in your details to claim the discount. Use code WELCOME30 to get 30% off your first purchase! Click here and fill in your details to claim the discount. Use code WELCOME30 to get 30% off your first purchase! Click here and fill in your details to claim the discount. Use code WELCOME30 to get 30% off your first purchase! Click here and fill in your details to claim the discount. Use code WELCOME30 to get 30% off your first purchase! Click here and fill in your details to claim the discount.

  • User Account
  • Business
  • Features
  • Earn
  • Login
  • User Account
  • Business
  • Features
  • Earn
  • Login
  • Languages
    • EN Help
    • DE Hilfe
    • BA Pomoć
    • FR Aide
    • Sl Pomoč
  • Languages
    • EN Help
    • DE Hilfe
    • BA Pomoć
    • FR Aide
    • Sl Pomoč
Get Started

User Account

5
  • How to register
  • General settings
  • How to change your password
  • How to add an additional user account for employees
  • How to edit permissions for accounts created for employees

Business Management

5
  • How to Set Up Email SMTP Settings
  • How to customize the appearance of invoices/estimates
  • How to set the tax rate
  • How to set up online payment
  • How to manage your business

App Features

9
  • Dashboard
  • Project Creation, Tracking, and Management
  • Creating and managing invoices
  • Creating and managing estimates
  • Managing accounts, vendors, expenses, and products
  • Managing customers/clients
  • How to create a recurring invoice
  • Managing business reports
  • Managing HR (Human Resources)

Subscription Management

1
  • How to manage subscriptions?

Earn with us

1
  • How to earn with us
View Categories
  • Home page
  • Knowledge Base
  • Business Management
  • How to Set Up Email SMTP Settings

How to Set Up Email SMTP Settings

1 minutes to read

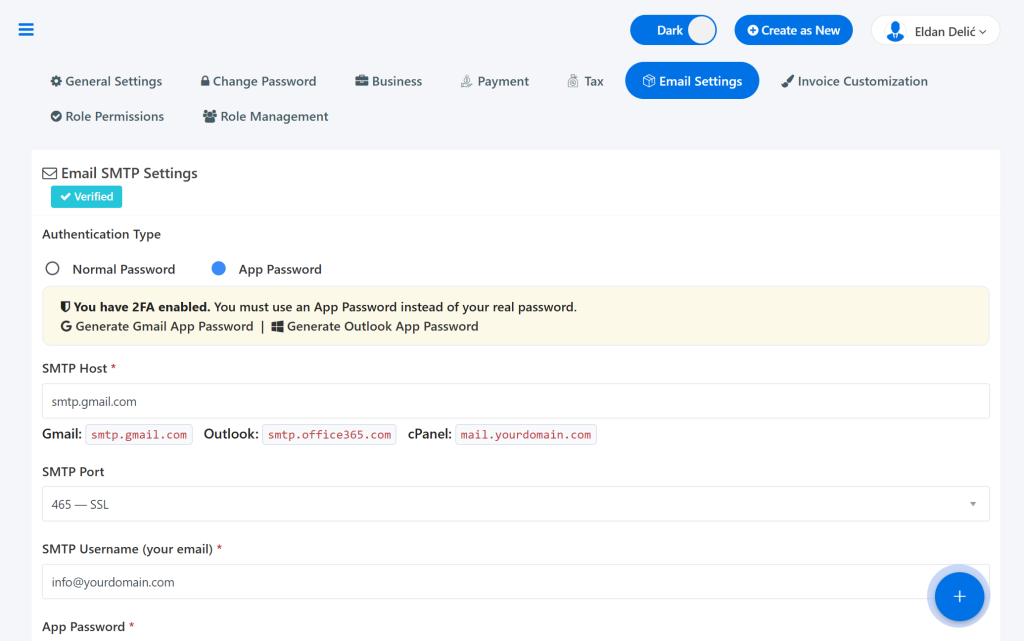
A new page, “Email Settings”, has been added to the AdBooks application settings. Every user must connect their email address in this section of the application to enable sending documents via email.
To access these settings, follow these steps:

  1. Click on your name in the top right corner of the screen.
  2. Select “Account Settings”.
  3. Click on the “Email SMTP Settings” option.

GMAIL WORKSPACE (info@yourdomain.com) #

App Passwords in Google Workspace are disabled by default by the Workspace administrator. To enable them, configuration must first be done at the admin level, and then on the individual user account.

Step 1: Enabling App Passwords (Admin Level) #

  1. Go to admin.google.com and log in as a Workspace administrator.
  2. Navigate to: Security → Authentication → 2-Step Verification.
  3. Ensure that 2-Step Verification is ON for users.
  4. Next, go to: Security → Authentication → Password management.
  5. Enable the option “Allow users to manage their own app passwords”.

Step 2: Generating an App Password (Individual User Level) #

Once the administrator enables the option above, each user can generate their own app password as follows:

  1. Go to myaccount.google.com.
  2. Click on Security → 2-Step Verification (this must be enabled beforehand).
  3. Scroll to the bottom of the page and select App Passwords (or access it directly via link: myaccount.google.com/apppasswords).
  4. Select app: Mail, select device: Other → type in “Invoice System”.
  5. Google will generate a unique 16-character password.
  6. Enter this password into the SMTP settings within the AdBooks application.

SMTP Settings for Gmail Workspace: #

  • Host: smtp.gmail.com
  • Port: 587
  • Username: Your email address (e.g., info@yourdomain.com)
  • Password: The 16-character app password generated above (NOT your regular Gmail password)

⚠️ Important: Your regular Gmail password WILL NOT work for SMTP – the configuration strictly requires an App Password.

MICROSOFT OUTLOOK / OFFICE 365 #

Microsoft has also disabled basic SMTP authentication by default since 2023. To re-enable it, follow these steps:

Step 1: Enabling the Authenticated SMTP Option #

  1. Go to admin.microsoft.com and log in as an administrator.
  2. Navigate to: Users → Active Users.
  3. Select the desired user (e.g., info@company.com).
  4. Click on the Mail tab → Manage email apps.
  5. Check the box for “Authenticated SMTP” ✅.
  6. Save changes.

Step 2: Entering SMTP Settings #

Once activated, enter the following details into the AdBooks application:

  • Host: smtp.office365.com
  • Port: 587
  • Username: Your email address (e.g., info@yourdomain.com)
  • Password: Your regular Office 365 password.

Additional Step for Microsoft Accounts with MFA (Multi-Factor Authentication) Enabled: #

If your account uses MFA, you will need to generate an App Password:

  1. Go to mysignins.microsoft.com.
  2. Click on Security Info.
  3. Click on Add sign-in method → select App Password.
  4. Name it “Invoice System” and copy the generated password to paste into the AdBooks SMTP password field.

⚠️ Important: Please keep in mind that you should not share this data with anyone for security reasons. Handle accessing and editing this information carefully to ensure the full security of your email server and business documents.

Updated on June 22, 2026

Kako vam je pomogao ovaj članak?

How to customize the appearance of invoices/estimates
Content
  • GMAIL WORKSPACE (info@yourdomain.com)
    • Step 1: Enabling App Passwords (Admin Level)
    • Step 2: Generating an App Password (Individual User Level)
    • SMTP Settings for Gmail Workspace:
  • MICROSOFT OUTLOOK / OFFICE 365
    • Step 1: Enabling the Authenticated SMTP Option
    • Step 2: Entering SMTP Settings
    • Additional Step for Microsoft Accounts with MFA (Multi-Factor Authentication) Enabled:

Start your free trial today!

Don’t wait! Start invoicing in just a few minutes and optimize your business.

Try for free
Facebook-f Instagram Youtube Jki-open-book-light
Company
  • Prices
  • About Us
  • My AdBooks Account
  • Blog
  • Knowledge Base
Legal Notices
  • Impressum
  • Terms and Conditions
  • Privacy Policy
  • Contact Us
Languages
  • English
  • Deutsch
  • Bosanski
  • Français
  • Slovenščina
Knowledge Base
  • EN Help
  • DE Hilfe
  • BA Pomoć
  • FR Aide
  • Sl Pomoč
AdBooks Knowledge Base

AdBooks Knowledge Base is your source for all information about our application. Find guides, tutorials, and answers to frequently asked questions in 5 languages: English, German, Bosnian, French, and Slovenian. The knowledge base is here to help you make the most of AdBooks’ features and improve your business.

© AdBooks. All rights reserved.